2022-07-01
How Skd Led Bulb Is Connected
Lighting is a flexible and daily element of the working. Each individual has their preference for lighting requirements and their definition of comfort and convenience.
Forest lighting understands that with minimum efficiency and safety requirements, each individual can have their spatial configurations and brightness preference for each lighting fixture or set of lighting fixtures to achieve a different comfort level in the workplace.
With the acceptance of LEDs, LED bulbs are also completely replacing the status of traditional incandescent lamps and entering the market. Compared with incandescent lamps, LED bulbs show many advantages.
So what is a bulb light? This article will introduce the structure, size, advantages, and production process of the bulb.
What is a bulb light?
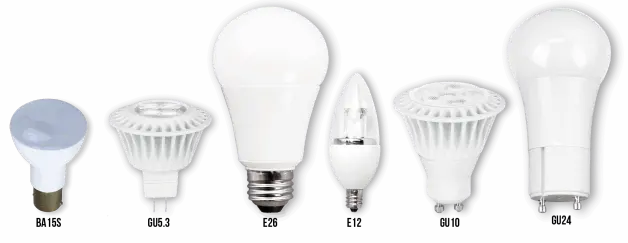
The LED bulb adopts the existing interface method, namely screw and socket (E26\E27\E14\B22, etc.), and even imitates the shape of the incandescent bulb to meet people's usage habits. Based on the unidirectional light-emitting principle of LEDs, designers have made changes to the lamp structure so that the light distribution curve of LED bulbs is the same as the point light source of incandescent lamps. Of course, energy-saving light bulbs have more color temperature choices such as smart bulbs, Not only adjustable the color temperatures of 2700K-8000K but also color change, by adjustable red, green, and blue different ratios, become led color differently.
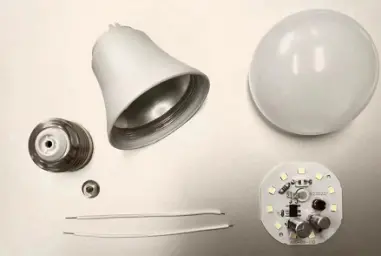
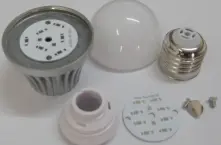
The structure of the LED bulb
The structural components of the LED bulb are Lamp Cover, PCBA, LEDs, driver, components, lamp cap, lamp body, etc.
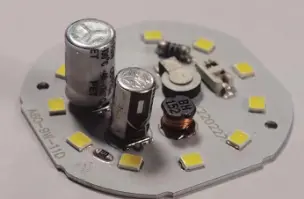
1. LED Driver of Bulb
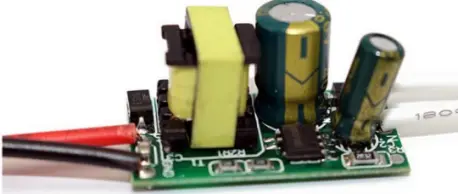
It is mainly divided into:
1: The schemes can be divided into three categories:
①Switching power solution, ②DOB solution, ③Driver less solution
2: Divided from the use of voltage range:
① narrow voltage AC 176-264V; ②wide voltage: AC 110-277V
3: From the aspect of stroboscopic, it is divided into:
Flicker driver: Flicker Free driver
4:Power factor: PF0.5; PF0.9
2. The LED Type of bulb

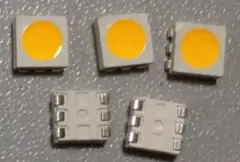
According to the size of LEDs, The 2835 and 5730 LEDs are mainly used in bulbs.
2835 LEDs means 3.5 (length) × 2.8 (width) × 0.8 (thick) mm , in generally, 3W LED bulb using 0.2W LEDs, and 9W, 12W Bulb using the 0.5W LEDs.
5730 LEDs means 5.7 (length) × 3.0 (width) × 0.8 (thick) mm , in generally, 5W, 7W Bulb using the 0.5W LEDs.
Compared with 5730 LEDs, 2835 has better comprehensive performance such as brightness and heat dissipation. 2835 has become the designated choice of LEDs for lamps, bulbs, panel lights, and other lamps in the LED industry.
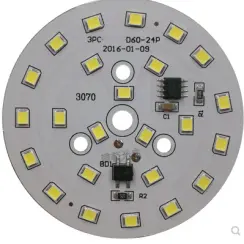
3. PCBA of LED Bulb

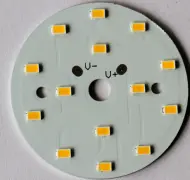
It is mainly divided into glass brazing PCBA and aluminum PCBA.
Fiberglass PCBA: made of fiberglass cloth with low cost and high-pressure resistance, but poor heat dissipation.
Aluminum PCBA: made of a special metal-based copper clad laminate, which has good thermal conductivity, poor electrical insulation, and high cost.
High-quality aluminum PCBA will be used for medium and high-grade LED bulb lamps.
4. LED Bulb heat sink
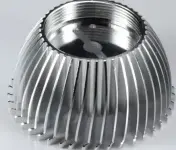
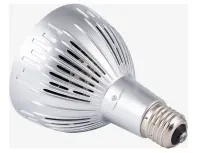
LED bulbs are all made of plastic-clad aluminum, which fully combines the insulation, corrosion resistance of plastic, and the fast thermal conductivity of metal aluminum. With the unique air convection structure, the heat dissipation is faster, the lifespan is guaranteed, and the light decay is reduced.
5. LED Bulb cover
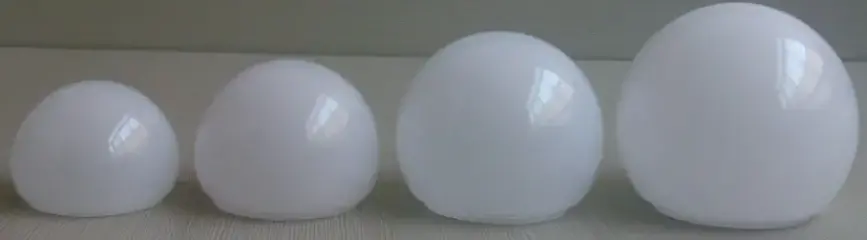
There are two common types of milky white cover and transparent cover on the market, and the materials are PC, glass, ceramics, silica gel, etc. Nowadays, the PC cover is the most popular material for LED bulbs, which has high light transmittance and uniform and soft light.
6 . LED Bulb body

The insulated PBT shell with good insulation and corrosion resistance
7. Lamp Cap
LED bulbs can be replaced by ordinary incandescent lamps. Conventional lamp holders include E27 and E14, and can also be customized for standard lamp holders in different countries.
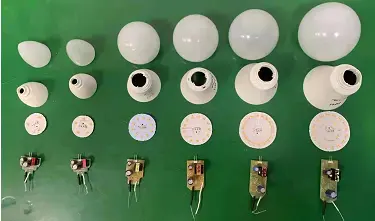
Common bulb sizes
| Wattage | 3W | 5W | 6W | 7W | 9W | 12W | 15W | 18W |
| Size | A45 | A50 | A55 | A55 | A60 | A60 | A70 | A80 |
Brief description of the manufacturing process
Production process 1:Plug component
- Split the component in PCBA into a single set,
- Insert the short side of the power off the wire into the terminal hole in the PCBA.
- Insert the short side of the resistor wire into the terminal hole in the PCBA.
- The product is gently placed on the assembly line and flows into the next process
Production process 2: Assembly PCBA
- Split the component in PCBA into a single set,
- Straighten the power leads of the PCBA
- Pass the PCBA through the aluminum shell, buckle the resistor lead on the edge of the aluminum shell, and straighten the power lead (neutral line).
- The product is gently placed on the assembly line and flows into the next process.
Production process 3: Install the mold and debug the equipment
- Turn on the power supply, turn on the air source, conveyor line, turntable, and processing and assembly cylinder fixtures of the automation equipment for empty machine operation. After each function shows normal, stop the machine, and turn off the power supply and air source.
- Select all kinds of tooling fixtures required for the product to be assembled. Replace the original tooling fixtures on the equipment
- According to product processing requirements, adjust the required running stroke of each cylinder
- The positioning mold and fixture are installed, and the start-up operation can be automated.
Production process 4: PCBA press into Shell
- Straighten the center line on the PCBA before placing the product into the mold, and the center line should be centered.
- Lightly place it in the positioning mold, do not touch the center line during the placing process.
- The indexing die of the equipment runs automatically, infrared induction operation, and the aluminum substrate is pressed into the aluminum shell.
- Go to the next process: the product is rotated on the disc.
Production process 5: Vibration of the lamps cap
- If the lamp head is stuck before pressing, turn off the switch and stop the equipment. Then deal with it.
- When the equipment is working, the operator's body, arms, etc. cannot lean on the running equipment to avoid personal injury and cause safety production accidents
- The power supply of the equipment is 220V AC. If the circuit problem causes the equipment to be abnormal, please do not handle it yourself, please notify the electrician to handle it.
Production process 6: Automatic cable management
- When the production of the equipment is abnormal, press the emergency brake switch to stop the equipment.
- When working, the operator's body, arms, etc. cannot lean on the running equipment, to avoid personal injury and cause safety production accidents.
- The stroke of the cable management fixture must meet the operation requirements to ensure effective action and avoid product defects
Production process 7: Press the lamp Cap
- The lamp body runs under the lamp head pressing mold, and the lamp head pressing mold sends the lamp head into the extrusion die cavity. Fix the center line clamp to clamp the center line.
- The slider is pushed forward, the hollow tube falls, and the center line is inserted into the hollow tube, the fixed center line clamp is released, and the pressing mold presses down the lamp head
- After the pressing mold presses down the lamp head, the hollow tube rises and returns to its original position. 4. Run the lamp body to the next process.
Production process 8: Automatic thread trimming
- The lamp body runs under the wire trimming die, and the wire trimming fixed die presses the lamp body
- The clamp of the wire-cutting fixed mold presses the mouth of the lamp body, and the scissors of the wire-cutting mold cut off the center line of the excess part.
- After thread trimming, each fixture returns to its original position. The turntable transfers the product to the next process
Production process 9: Screw the bulb cap nail
1 When the lamp head nails are rotated and vibrated by the vibration plate, push back and forward into the conveying track, and then enter the nail row area.
- The nail feeding fixture transfers the lamp head nails to the nail press die, and the nail press die head is pressed down and sucked.
- Press the nail to die to press the lamp head nail into the hole in the lamp head
- The nailing die rises and returns, and the product is transferred to the next process.
- The re-pressing nail mold will re-press the lamp head nails on the lamp head 2-3 times. Make sure that the lamp head nails are pressed in place.
Production process 10: Product testing
- Open the cabinet and adjust the power test data.
- The test fixture is pressed down and moved forward to the lamp head.
- The test contacts are connected to the positive and negative (LN) poles of the lamp body, and the power is turned on to test the lamp
- When the test light is on, it means the product is qualified, if it is not on, it means the product is unqualified. If the power of the light is beyond the range, it is also regarded as unqualified. The automatic equipment will be taken out.
- The unqualified products will be removed by this automatic arm and transferred to the unqualified product box.
Production process 11: Gluing
- Before the lamp body arrives, glue the smelting tool for work
- Stop the lamp body, apply glue, and press down the lamp bod
- When the mold runs to the gluing position, when there is no lamp body in the mold, there is no infrared induction, and the glue gun head will not drop to glue
- When there is a lamp body in the mold, the infrared sensor will lower the glue gun head and apply glue
- Glue the gun head is glued The gun head rises and returns to its original position Rotate the disc to move the lamp body to the next process
Production process 12: Lamp cap riveting
- the lamp body runs under the riveting mold
- The rocker of the riveting die swings and presses the lamp cap tightly
- After the lamp cap is riveted tightly, the die head is loosened and returned
- Rivet and press the lamp cap, and move the fixture to the next process
Production process 13: Assembly lamp cover
- Place the used bubble shells on the bubble shell transportation line in order
- When the infrared ray cannot sense the lamp body, the fixture will automatically stop and the nonpressure bubble shell will act
- When the infrared ray senses that there is a lamp body, the fixture drops and presses the bubble shell into the lamp body
- When there is no lamp body in the rotary table mold, the infrared nnoninductionfixture head will not act
- After pressing the bubble shell into the lamp body, loosen the clamp, lift and transfer the bubble shell to the position of grasping the bubble shell, and continue to grasp and press the bubble shell repeatedly
Production process 14: aging
- SpSpot-check the equipment and make sure the working procedure of the equipment is normal
- Wear protective glasses and insulating gloves when working
- Place the bulb on the lamp holder Arrange neatly
- If there is a product that does not light up during placement, take it out and replace it with another product for aging
- After aging, remove the bulb and transfer the product to the next process for inspection and sorting
Production process 15: Laser
Production process 16:LED Bulb inspection
- The conveying line transports the bulb to the inspection position, and the operator checks the appearance. If there is glue overflow, wipe it off with a rag
- Reassemble the loose parts after assembly, and put them into the finished product frame after passing the inspection
- Put the unqualified products in the box of unqualified products (together with the self-inspection efeffectiveoducts in the market)
- The finished product will enter the aging process
Production process 17:Product cleaning
- Pour the wiping agent onto the cleaning cloth to wipe the oil stain on the surface of the product
- If it is not cleaned after repeated wiping, it shall be placed in the defective product box for treatment
- After wiping, put the product gently on the assembly line and pack it in the next process
Production process 18:Packaging
- Label the color box according to the customer's requirements
- Put the buldownrd into the color box for packaging
- Put the color box into the outer box in the same direction for packaging
- I-shaped or I-shaped sealing box. (as required)
- The outer boxes are stacked on the pallet. Doing goa od job of dumping, standard height, and super hheightsstrictly prohibited
- warehousing after quality control inspection
Solar Yard Lights: How it Works?
Light bulb Philippines suppliers – How to choose the right light bulb